Getting Started With Hugo Academic and Github Pages
Last updated on
Dec 23, 2021
Table of Contents
This post describes how one can set up a personal website using the
Hugo Academic theme for the static site generator
Hugo and publish it automatically with
GitHub Pages. It is targeted towards readers who have a basic
understanding of how to use git from the command line and who already have a GitHub account. This
post is based on Hugo Extended 0.73.0 and Hugo Academic 0.49, which were the respective latest
releases at the time of writing (July 2020).
The final goal will be to have two GitHub repositories: a source repository
that contains the website’s unprocessed resources and a host repository that hosts the
the generated website. We will use GitHub Actions to
automatically deploy from the source to the host repository, i.e., if a change to the website is
commited and pushed to the source repository, our GitHub Actions setup will auto-generate the actual
website with Hugo and create a new commit on the host repository.
1. Prerequisites
As stated above, you need to have a GitHub account and at least some familiarity with using git from
the command line. Furthermore, you also need to install Hugo on your machine, such that you
can build and test your website locally before deploying it.
The easiest way to set up Hugo is to download and unpack the latest release from the
Hugo releases website on GitHub. For more information
on installing Hugo, refer to the
official installation instructions.
Make sure you install the extended version of Hugo, which is required to build the Hugo Academic
theme.
2. Create source repository
As a first step, we will create a new source repository on GitHub. It will hold your website’s
unprocessed sources, from which the website’s HTML documents will be built. The
official docs recommend to fork the
Academic Kickstart repository. However, this
prevents you from making your source repository private, which is why I decided to take a
different route and manually duplicate the Academic Kickstart repository to my GitHub account:
Create a new repository on GitHub, e.g., academic-kickstart. You can safely make it private,
but do not initialize it with at README. In this post, I will call the source repository
academic-kickstart-demo and it is available
here.
Make sure to replace the URL of the source repository with your own!
3. Set up initial website
Before proceeding to make modifications, you should have a look at the initial state of the website
and verify that everything works. To do this, you first need to initialize the git submodules by
running
git submodule update --init --recursive
This step is required once after you clone your source repository to a new location, as it will
download necessary files for the Hugo Academic theme to work. Then, you can build your website
locally by executing hugo, which will generate the website and place all files in the public/
directory. Alternatively, you can also start a local webserver with
hugo server
which will build the website and make it available at
http://localhost:1313.
In this mode Hugo will automatically re-generate your site whenever you change your
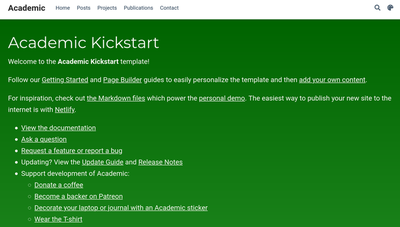
sources, which comes in handy while developing your contents.
Initial state of the website before any modifications.
Now it is time to set up the initial website. A full description of what to do can be found in the
official
Getting Started
guide. The most important files to configure your website are the following:
config/_default/params.toml: Parameters for individual features.
config/_default/menus.toml: Configure main navigation bar.
content/authors/admin/_index.md: Details about the main user (you!).
Due to extensive inline documentation, all files are more or less self-explaining. The content/
subfolder contains all user-editable source files from which the website is built. For the initial
setup, disable all sections on the main homepage for which you do not have created your own content
yet by either deleting them from content/home or by moving them to a different folder.
Here is a short todo list to help you set up initially. To see the respective changes in the
academic-kickstart-demo repository, click on the linked git commit:
Edit config/_default/config.toml and change title to your website’s title
(diff).
Edit config/_default/params.toml and make the following modifications
(diff):
Disable edit_page by commenting it out (prepend with #).
Edit the contact details like email, phone etc. Everything you do not need, you can just
comment out by prepending a # symbol.
Disable showing a map by setting engine to 0 in the [map] section.
Disable unused widgets on the homepage by executing
Edit content/authors/carl-friedrich-gauss/_index.md and enter your information. Most
importantly, change the username under authors: from admin to your new username (= folder
name under content/authors/), e.g., carl-friedrich-gauss.
Edit content/home/about.md and change author from admin to your new username.
Use hugo/hugo server to verify that everything is set up correctly (even if most useful content
is still missing) and git push the source repository to GitHub.
4. Create and set up host repository
GitHub Pages allows you to host static websites on GitHub, which is
ideal for websites generated with a static site generator such as Hugo. For each project (=
repository) you have on GitHub, the corresponding GitHub pages website will be available under
For the special project name
YOUR-GITHUB-USERNAME.github.com, the website will be served directly under
https://YOUR-GITHUB-USERNAME.github.com
That is, without the project name suffix. For example, for
my GitHub user account sloede, the special project name is
sloede.github.com and the website is available under https://sloede.github.com (this will actually
redirect you to this website).
In this tutorial, we will use academic-pages-demo as the host repository name, since my canonical
repository name sloede.github.com is obviously already taken. Go to GitHub and create a new
repository, in my case
academic-pages-demo.
As per the
documentation,
your host repository needs to be public unless you are on a GitHub Pro account. This time, also
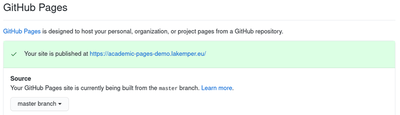
tick the box to initialize the repository with a README for testing purposes. On your newly created
host repository site, go to Settings, scroll down to the GitHub Pages section and select master
branch as your website source. Please note that in my case the URL differs from what you will see
since I have already set up a
custom domain for my GitHub Pages.
GitHub Pages settings to select which branch to serve as a website.
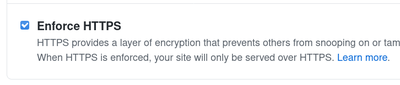
It is also advisable to tick the box Enforce HTTPS, since SSL-encrypted website connections are
the norm nowadays.
Now your host repository’s content (currently only the README file) will be available online and you can make sure that everything works by clicking on the link in the green box:
Initial GitHub Pages website showing the README file.
Before we proceed to auto-deploy your website, we will quickly verify that the GitHub Pages
displays the Hugo Academic website properly. To do this, perform the following steps:
Delete the existing public/ folder in your local clone of the source repository and clone your
host repository as the public/ subfolder:
rm -rf public/
git clone git@github.com:sloede/academic-pages-demo.git public
Rebuild website:
hugo
Remove the README.md file (as otherwise your website will not be shown), add all files in
public/ to git, and commit & push:
cd public
git rm README.md
git add .
git ci -m 'Initial commit of Hugo Academic website'
git push
cd ..
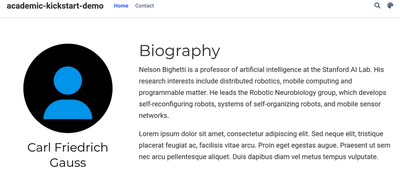
When you go to the GitHub Pages URL of your host repository, the website should now look something
like this:
GitHub Pages website showing Hugo Academic website.
Congratulations, your initial website is now online! To avoid accidental manual commits to the host
repository, especially after we have set up automatic deployment in the next section, delete the
.git folder from the public/ subdirectory:
rm -rf public/.git
5. Automatically publish changes in source repository on your website
As the last step, we will enable the automatic deployment from your source repository to your host
repository. That is, whenever you push changes to your website to the source repository, we want to
automatically update the host repository - and thus the actual website - as well. Since we created
two separate repositories for the website’s sources and its processed files, we first need to create
a deploy key to allow the source repository to automatically update the host repository.
Following the instructions for creating a deploy key at
https://github.com/peaceiris/actions-gh-pages,
you need to perform the following steps:
This will create two files: the public key gh-pages.pub and the private key gh-pages.
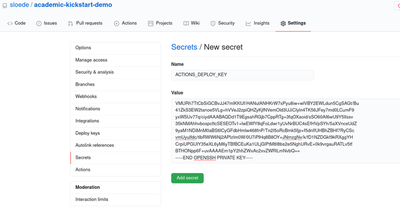
Go to the repository settings of the source repository (here: academic-kickstart-demo), go to
Secrets, and add a new secret with the name ACTIONS_DEPLOY_KEY (spelled exactly like this)
and the contents of your secret key file gh-pages as the value:
Add SSH secret key as new secret ACTIONS_DEPLOY_KEY to source repository.
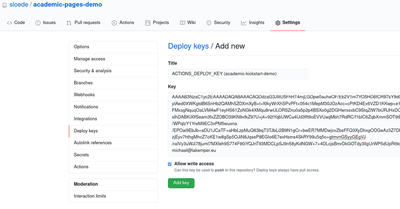
Go to the repository settings of the host repository (here: academic-pages-demo), go to
Deploy Keys, and add a new deploy key with the title
ACTIONS_DEPLOY_KEY (academic-kickstart-demo) and the contents of your public key file
gh-pages.pub as the value. Make sure that the box for Allow write access is checked, as
otherwise the source repository will not be able to update the host repository:
Add SSH public key as new deploy key to host repository.Unlike for the newly added secret in the source repository, the exact title of the deploy key is
not relevant for the automated deployment to work, but I recommend a descriptive name that
reveals its purpose.
After you have added the secret and the deploy key to the source and host repositories, you
should delete the SSH key files, as their contents will not be needed
again (and in case of the secret key, it is a security issue to leave it around):
rm gh-pages gh-pages.pub
With the deploy key in place, we can proceed to automatically update the host repository
whenever a commit is pushed to the source repository. For this purpose, we will use
GitHub Actions and create a workflow file that checks out the
source repository, builds the website using Hugo, and adds the generated files to a new commit to
the host repository.
Go to your local clone of the source repository and create the GitHub Actions workflows
directory:
mkdir -p .github/workflows
Next, create a new workflow file in .github/workflows, e.g., .github/workflows/GitHubPages.yml,
with the following content:
name: GitHub Pages

on:
  push:
    branches:
      - master

jobs:
  deploy:
    runs-on: ubuntu-20.04
    steps:
      - uses: actions/checkout@v2
        with:
          submodules: true  # Fetch Hugo themes (true OR recursive)
          # fetch-depth: 0    # Fetch all history for .GitInfo and .Lastmod

      - name: Setup Hugo
        uses: peaceiris/actions-hugo@v2
        with:
          hugo-version: '0.73.0'
          extended: true

      - name: Build
        run: hugo --minify

      - name: Deploy
        uses: peaceiris/actions-gh-pages@v3
        with:
          deploy_key: ${{ secrets.ACTIONS_DEPLOY_KEY }}
          publish_dir: ./public
          publish_branch: master  # deploying branch
          cname: academic-pages-demo.lakemper.eu
          allow_empty_commit: true
          external_repository: sloede/academic-pages-demo
Here, I will briefly explain each part of the file so you know what it does:
Set name of this workflow to identify it on GitHub.
name: GitHub Pages
Execute this workflow whenever someone pushes to master:
on:
  push:
    branches:
      - master
Run a deploy job with a number of steps to execute (will be described
below). Execute the job on a virtual machine running Ubuntu 20.04.
jobs:
  deploy:
    runs-on: ubuntu-20.04
    steps:
    [...]
A list of available virtual machines can be found in the
GitHub documentation.
I recommend to use a machine as close as possible to your personal system to avoid surprises.
Check out the source repository using one of the GitHub-provided “actions”,
which is just a fancy term for a script specifically written to be run in
GitHub workflows.
- uses: actions/checkout@v2
  with:
    submodules: true  # Fetch Hugo themes (true OR recursive)
    # fetch-depth: 0    # Fetch all history for .GitInfo and .Lastmod
Download and install Hugo using the
peaceiris/actions-hugo
action. The extended version of Hugo is required for the Hugo Academic theme
to work, and I recommend to use the same Hugo version number as you use locally.
Build the website and minify, i.e., try to reduce the website file size. By
default, Hugo will place the resulting files in the public/ subdirectory.
- name: Build
  run: hugo --minify
Deploy the built website to your host repository using the
peaceiris/actions-gh-pages
action. The value of deploy_keymust match the secret key name you
used before, here it is called ACTIONS_DEPLOY_KEY. The publish_dir must match the
directory to which hugo writes its generated files (default: public/). The
publish_branch is the same branch that you selected
above
when you set up the host repository. cname should be set to the custom
domain name you serve your GitHub Pages from, and can be omitted if no custom
domain is configured. With allow_empty_commit, any push to the source
repository will trigger a new commit to the host repository, even if there
were no user-visible changes. The external_repository must be the name of
your host repository on GitHub, i.e., its web URL without the https://github.com/ part.
Once the workflow file is in place, add, commit & push it to the source
repository:
git add .github/workflows/GitHubPages.yml
git ci -m 'Add workflow to automatically deploy website'
git push
The corresponding commit to the
academic-kickstart-demo
repository can be found
here.
You can verify that the workflow succeeded by going to your source repository
website on GitHub - next to the latest commit info should be a small green
checkmark:
This workflow succeeded without errors.If you see a small brown circle instead of the checkmark, your action is still
running. If the workflow indicator is a red cross, however, it means that
something went wrong.
Similarly, you can check the host repository for a
new
commit,
which will reference the commit to the source repository from which the current
website was built:
Automatically created commit on the host repository.
6. Where to go from here
If everything went smoothly, you now have your own website online, generated
from the Hugo Academic theme and auto-deployed to GitHub Pages. Your immediate
next steps should be to update your user information (such that the dummy text
provided by the academic-kickstart repository can be thrown out). Then,
you can successively build up your personal website by either following the
Hugo Academic documentation or by just experimenting. Always remember to only
ever commit to the source repository directly, since manual commits to the host
repository will be overwritten by the next automatic deployment.